Share this
by Sylvain Doré on March 22, 2022 7:53:00 AM EDT
All businesses and organizations always deal with at least one workflow, and graphic design businesses are no exception. The more efficient a business can execute its workflow(s), the more effective and productive it will be as an organization. This is where workflow management comes in.
Workflow management is an effort to map, analyze, and optimize a workflow to be as efficient as possible. However, in graphic design businesses and creative businesses, a key challenge in implementing workflow management is finding the right balance between maintaining creativity and optimizing the workflow.
Workflow management, in essence, is about providing structure to a workflow to ensure efficiency. Still, it's also no secret that structure and rigidity may limit creativity, which is essential for a creative business like a graphic design agency.
In this guide, we will discuss how to effectively implement workflow management in graphic design, covering the following elements:
-
What is workflow management?
-
Unique challenges of workflow management implementation in graphic design
-
Typical anatomy of a graphic design workflow
-
Step-by-step guide on implementing workflow management in graphic design
What Is Workflow Management?
Workflow: The Definition
 To answer what workflow management is, we have first to understand 'workflow.'
We can define a workflow as a set of tasks, typically sequential, that, when executed, will achieve (successfully or unsuccessfully) a specific objective. You can think of a workflow as a map that gets you from point A to point B in a project.
Specific in graphic design, a graphic design workflow refers to all the necessary tasks and steps that have to be completed before a graphic design deliverable can be presented (to the higher-ups or the client).
As we know, a graphic design project can involve many different moving parts, and it's also important to understand that every project and every workflow is unique with its different goals.
Different Types of Workflows
There are three different types of workflows, each with its unique characteristics:
-
Process workflow: often called "business process" or just "process," it is a workflow with predictable steps that is also repeatable. Repeatable here means that when a process workflow is given the same input, it should produce the same input (or at least with minimal variations). A client approval process is an example of process workflow in a graphic design business environment.
-
Project workflow: a project workflow also has predictable steps/tasks, but it is not repeatable. When given the same input, two different projects will produce different results. A graphic design project from a client is an obvious example of a project workflow.
-
Case workflow: a case workflow is both unpredictable (you don't know the steps/tasks until you've gathered more information) and unrepeatable. Handling a client's complaint is an example of a case workflow in a graphic design business.
Workflow Management: The Concept
Now that we've understood the definition and concept of a workflow, what is workflow management software?
We can define workflow management as an act of managing and optimizing the workflow to make sure it's executed as efficiently as possible. While the actual workflow management practice may vary depending on the workflow itself as well as the graphic design agency, a typical workflow management process consists of three main phases:
-
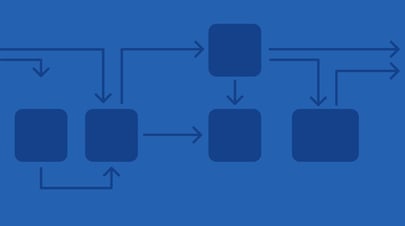
Workflow mapping: mapping and documenting the workflow as a workflow diagram. Typically in the form of a flowchart to accurately represent how the workflow is currently executed.
-
Workflow analysis: analyzing the workflow diagram and data gathered during the workflow mapping process to identify bottlenecks and inefficiencies in the workflow. In this phase, we also create an improvement plan for the workflow.
-
Workflow optimization: optimizing the workflow according to the improvement plan created in the workflow analysis phase. After changes have been implemented, they should still be monitored to ensure positive impacts on the workflow's efficiency. If necessary, another round of analysis and optimization may be performed.
Typical Graphic Design Workflow
While workflows may vary between different graphic design agencies and even between different processes/projects in a single agency, a typical graphic design workflow will include the following steps/tasks:
1. Receiving and reviewing project brief
 A graphic design project typically begins with the graphic design team receiving a project brief (from clients or higher-ups).
The project brief should include all kinds of information required to execute and finish the project: the target audience, specifications of the deliverables, references, and other relevant information.
If a client gives the project, the brief is typically given through a client meeting. Use this meeting as an opportunity to gather as much relevant information as you can about the project.
The purpose of the brief is to help the graphic design agency/team understand the scope of the project and the desired result, and it should include the following information:
-
The client's organization details that are relevant for the project
-
Brand guidelines
-
The target audience of the project
-
A buyer persona (modeling the audience's behavior and expectations)
-
Type of deliverable
-
The timeline of the project (should be broken down into milestones)
-
Project budget
-
References (i.e., similar products/projects)
Arguably, this is the most crucial step of the graphic design workflow since it will significantly affect all the other steps. Thus, do your homework and attempt to gather as much information as possible about the client's preferences, target audience, and competitors, which we'll cover in the next step.
2. Research phase
 A crucial step of any graphic design project is the research phase to help you understand all different aspects of the project's deliverable. In this phase, the graphic designer (or the graphic design team) should perform thorough market research to gather as much information as possible to help the project's execution.
The more information you have about the project's target audience, the better you can define the direction of the graphic design project as a whole, which will affect all the future decisions related to this project.
Consider gathering information regarding the following aspects of the project:
-
The client: what the organization does, designs of their past products/marketing materials, etc.
-
The target audience of the project
-
The client's competitors and their designs
-
Current trends in the specific industry
This research aims to make important decisions about what the design product should or should not be.
3. Moodboarding
Once the research phase is complete, you should now understand the client's and the audience's wants.
This phase is about figuring out how you can fulfill these wants, and the best approach is to brainstorm and create mood boards.
In a graphical design environment, a mood board refers to a collection of visuals to help you grasp the intended "mood" of the project, hence the name. The basic idea behind a mood board is that by seeing these visuals compiled based on the interpretation of the project brief, the graphic designer can better grasp the project's result.
A mood board should be dictated by the project brief and can also offer the following benefit:
-
Helping the graphic design team to stay on track by reminding them about the desired product and mood while the team is working on the project
-
Easier collaboration since team members can easily consult the mood board whenever they are unsure about the project.
-
A comprehensive visualization provided by the mood board can make it easier
Use the mood boarding process as a chance to gather ideas from and collaborate with your team members. Involve your client when possible to decide on the essential elements of the project before the actual design.
Once you've finished the mood board, present it to the client, and you can start the next phase: brainstorming.
4. Brainstorming
 Brainstorming is, put, an internal discussion with your team (or yourself) to decide what you are going to design for the client according to the client's brief and approved mood board.
If you work alone (i.e., as a solo freelancer), you can do the brainstorming on your own, but the goal remains the same: coming up with creative ideas to figure out how you'll satisfy the client's requests.
5. Create your first draft
In this stage, you can start working on the design based on the brainstorming results, and typically most designers will first create a rough sketch for the project's design. Some designers might opt to sketch by hand (including with digital pens), but you can also use other tools and technology solutions depending on your style.
Nevertheless, use the mood board created in the previous step as your guide in making this first draft. The focus of this step is to fine-tune your ideas: test which ideas are working and which won't.
6. Concept development
After your first draft, you should start seeing which ideas are going to work and which aren't. This step is mainly about sorting out your ideas: choosing what will work best to answer the client's problems according to the brief.
Narrow down your ideas into just one final concept, and present it to the client.
This concept should align with the client's brief and should be appropriate for the client's target audience. However, at the same time,
init should be unique with clear differentiation from what's currently available on the market.
7. Exploring ideas and refining concept
This step is about experimenting, and this is where your design starts to look like what you might present to the client. Explore different ideas and use whatever tools/software solutions you find appropriate to refine your concept.
You may also want to incorporate a workflow automation solution to streamline the workflow and facilitate communication/collaboration. Workflow management software will also help in the approval/proofing process for graphic designers, which we'll discuss in the following steps.
Along the way, continuously evaluate what you've designed so far, whether it's aligning well with the project brief. Also, assess whether the design is a good fit for its target audience while being unique enough compared to the client's competitors.
Keep refining your design and experimenting with your ideas until you believe they can meet the client's expectations according to the brief.
Present the refined design to your client once you've answered yes to all the questions above.
8. Revising the design in response to the client's feedback
If your client accepted your design right away, congratulations, and you can skip this step.
However, we all know that in most cases, revising the design in response to the client's feedback is an unavoidable aspect of a graphic design workflow.
While it's true that the client is king, it's essential first to evaluate whether the client's feedback is constructive and aligns well with the initial brief.
Also, evaluate whether the changes requested by the client are possible to execute within the project's deadline. Don't be afraid to communicate the situation to the client and find a solution. It's essential to establish clear boundaries regarding revisions to minimize revision cycles so the project won't get stuck in the approval process.
Some clients may change their minds after they've given themselves some time, so give them one day or so to think about their feedback, and ask them again for confirmation whether you should proceed with the revision. This is to prevent unnecessary revision cycles.
If possible, establish a limit to the maximum number of revisions with your clients to ensure your project can stay within deadlines (and budget).
An essential consideration in this step for graphic designers is to avoid being too attached to what you've designed. Remember that the client is paying, so you should focus on meeting their expectations. Revise the design until your client is satisfied, and you can move on to the next step.
9. Gaining client's approval
 It's finally time to present your final deliverable to the client. Depending on the client, you may need to present the final design to an individual or a team, so you may need to accompany the design with a comprehensive presentation.
This step aims to get the client's final approval and sign-off.
10. Finalize the design product
Depending on the type of graphic design work you are doing, you may need to produce the product (i.e., a poster or a product packaging). However, if the product is digital in nature (i.e., a website), then you can go straight into launching the product.
This step should also involve a final check of whether you've fulfilled the guidelines set out in the project's brief (to avoid future disputes). Make sure you've also secured the client's sign-off in writing so you can close this project (and send your invoice)
How To Optimize Your Graphic Design Workflow
As we've discussed, managing and optimizing your graphic design workflow will involve three main phases: workflow mapping, workflow analysis, and workflow optimization. The goal of these phases is to ensure you can complete the graphic design workflow with as few resources (and less time) as possible without sacrificing quality.
While implementing workflow management to a graphic design workflow might seem intimidating at first, we can achieve it in just a few simple steps:
Step 1: Information gathering
The first and arguably the most crucial step is to gather as much information as you can about your design workflow.
A good approach is to interview the team members and stakeholders involved in the graphic design workflow and observe the workflow from start to finish and analyze key performance metrics.
You should collect at least the following information:
-
The triggers for the start and end of the workflow
-
All the tasks required to finish the workflow
-
The exact sequence of tasks/steps
-
Who's responsible for supervising and executing each task
-
Timelines of each task
-
Resources/information needed to fulfil each task
The more information you can gather, the more accurate your workflow diagram/map is. So, take your time.
Step 2: Mapping a graphic design workflow diagram
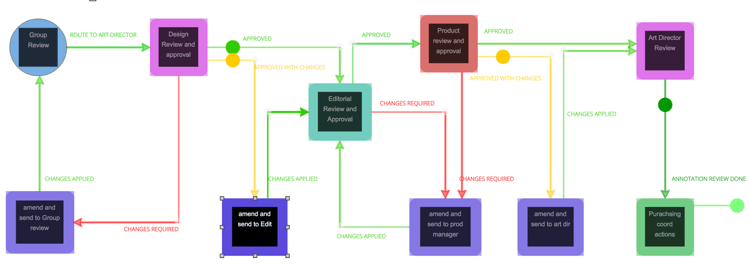
Based on the information you've gathered in the previous step, we can start creating a visual representation of the workflow in the form of a workflow diagram.
While you can use various tools and techniques (even pen and paper will do), we'd recommend using the built-in business workflow builder tool on your workflow management solution. This way, you can use the same platform for mapping, analysis, and optimization to streamline the workflow management process.
You can use a standard flowchart to start mapping the workflow diagram. You should map the workflow as-is (how it is currently executed) rather than to-be (how you'd like it to be efficiently executed) to ensure an accurate analysis process.
So, aim to be as accurate as possible. Again involve your team members/stakeholders in the mapping process to give their input and feedback.
Step 3: Workflow analysis
Once you've got an accurate mapping of your graphic design process, we can move on to the analysis phase. Again, the more accurate the workflow diagram is, the easier it will be to perform your analysis.
This analysis phase aims to identify inefficiencies and bottlenecks so that you can devise an optimization plan for the design workflow.
Analyze both the qualitative and quantitative aspects of the workflow:
Quantitative data:
-
How often will the graphic design workflow be executed in a specific timeframe (i.e., monthly)?
-
The average time it takes to complete each task?
-
The success rate of each task
-
Which team member/designer is taking the most time or least time to complete each task
-
Who is involved in the design workflow?
-
What information is involved during the workflow's execution, and how often will the information be used throughout the workflow?
-
How does the workflow comply with your business's policies?
Also, monitor the key performance metrics of the workflow and aim to identify redundancies and bottlenecks. Create an optimization plan based on the result of this analysis.
Specific for a graphic design workflow, pay extra attention to the approval/review process. The approval process is often a significant bottleneck in a graphical design workflow, and the better you can optimize it, the more streamlined the whole workflow will be. Focus on reducing the number of revision cycles and speeding up the approval process.
Step 4: Workflow optimization
 Based on the workflow analysis results, this step is about implementing the changes you've planned.
Modify the workflow diagram as you implement each intended change, and test the changes to make sure they actually bring positive improvements to your graphic design workflow.
Again, involve your team members and stakeholders so they can review the changes and give their feedback. If the planned changes don't go according to plan, it's okay to go back to the workflow analysis phase (or even the mapping phase) and re-analyze everything.
Optimize the workflow as needed, and remember that the goal is to make the workflow as efficient as possible.
Step 5: Monitoring the optimized workflow
Once all these changes have been implemented, continuously monitor the performance of the workflow.
We shouldn't treat workflow management as a one-off thing but rather a continuous process. Even if the workflow is already efficient, new technologies and new challenges will arrive, and you may need to re-optimize the graphic design workflow yet again.
If possible, gather feedback from clients and use these insights to improve your workflow further.
Wrapping Up
Implementing workflow management in a graphic design workflow can be pretty challenging due to the nature of the graphic design business. On the one hand, graphic design is about creativity and freedom, while workflow management, essentially, is about putting structure to the process (which, when done incorrectly, may limit creativity).
Finding the sweet spot here is crucial, but you can start creating and optimizing your graphic design workflow by following the tips we've shared above.
No Comments Yet
Let us know what you think