Share this
by Sylvain Doré on August 26, 2021 9:18:00 AM EDT
Implementing efficient and creative workflows always poses a unique challenge: we are essentially putting a structure over a creative process that’s supposed to be “free.” Thus, finding the right balance between optimal structure and creative flexibility is very important yet often very difficult.
 Creative works and projects are typically tied to deliverables (the creative work themselves) and deadlines. Without an optimal process for planning, executing, and approving the work, meeting the deadlines, and ensuring work stay on its budget can be continually disrupted.
This is why implementing and optimizing a creative workflow is very important: we’ll have a structured process that tracks and directs all the innovative operations, encouraging effective collaborations, avoiding confusion, and ultimately, saves time and money.
This guide will discuss all you need to know about implementing an efficient, creative workflow in a step-by-step guide.
Again, remember that the objective of a creative workflow is to accommodate both tracked structure and flexibility, and without further ado, let us begin from the beginning: the concept of the creative workflow itself.
What Is Creative Workflow?
First, what is a workflow?
A workflow, also called a process (business process), is a sequence of steps through which a work process passes from initiation to completion. When a workflow is finished, the organization will successfully or unsuccessfully achieve an objective.
Thus, a creative workflow is assigned to a creative process: from ideation/conception, development of creative work, approval process, and finally launching the creative deliverable.
Creative Workflow Management
Creative workflow management is an effort to track the workflow of creative processes. Creative workflow management is performed by:
-
Visualizing the creative workflow into a workflow diagram, typically in the form of an ANSI flowchart
-
Analyzing the workflow diagram (workflow analysis) to identify inefficiencies, bottlenecks, and redundancies
-
Developing optimization and automation plan according to the workflow analysis
-
Implementing changes and automation
-
Reviewing changes
Typical Model for Creative Workflow
While each creative workflow is unique, most creative processes will involve four primary phases:
-
Ideation and definition
-
Development
-
Review and approval
-
Launch
Let us discuss these phases one by one.
Phase 1: Ideation and definition
 This first phase of the creative workflow is pretty self-explanatory. This phase identifies the general concept for the desired creative product, its target audience, and the resources required to develop this product.
If the creative project is executed for a client, this phase will typically start from a project brief given by the client. If the creative process is for an internal purpose, then we can develop this phase from scratch.
Nevertheless, in this phase, we should produce:
-
A detailed outline of the workflow’s objectives and goals. When defining goals, we can use the SMART (Specific, Measurable, Attainable, Relevant, and Time-Bound) approach.
-
Establish KPIs and metrics according to the defined objectives, break down bigger goals into smaller milestones when possible
-
The team’s structure, assigning roles and responsibilities
-
Develop a risk management plan. Identify risks and potential problems of the workflow, and plan the steps to tackle these issues when they happen.
-
Competitive analysis to understand how to develop UVP (Unique Value Proposition) for the deliverable
-
Set up a schedule to manage the workload of the creative project
-
Identify the required resources, tools, and equipment to execute the project, including software solutions, templates, and others.
-
Manage the client’s expectations for the creative project
Phase 2: Development
The second phase is about the actual development/creation of the creative product. This phase might vary a lot depending on the desired product and many other factors, but typically will include the following steps:
-
Brainstorming to generate creative ideas and concepts
-
Competitive analysis to check similar products available on the market, as well as competitors’ products
-
Documenting ideas into a finalized concept and sharing the picture with the whole team
-
Updating the client about the team’s ideas and progress to ensure development stays on the right track
-
Using the required tools to execute the product creation, including collaboration tools to help the team collaborate
-
Managing files and data throughout the development process
-
Creating and maintaining a collaborative work environment to maintain team’s productivity
-
Managing the schedule to ensure all team members meet the deadlines
-
Managing resources to ensure the project stays within budget. If working for a client, track the time spent against the project’s budget for billing purposes.
-
Providing regular status updates to your client
Phase 3: Review and Approval

A unique phase to the creative workflow is the approval process. When not managed well, the approval process can be a significant bottleneck to the whole workflow. So, this phase is typically the most crucial to optimize.
Again, while the process might vary, here are the typical action items that might be included in this phase:
-
Internal approval process between the content creator/creative worker with the creative manager/director.
-
Sharing content with the client. This may require specific tools that allow you to send large files in particular formats. Workflow automation software with online proofing capability like Aproove can simplify this process.
-
Using a solution that can centralize feedback from team members and stakeholders to maintain a clear and streamlined approval process
-
Establishing a review/approval structure, including limiting the number of revision cycles.
-
Create a system to manage, organize, and respond to feedback from clients
-
Track the amount and quality of feedback, and make sure it stays within the contract if you work for a client.
This phase is finished once you’ve secured the final approval for the deliverable from your client or your creative manager/director if it’s an internal creative project. Past approval deadlines, the creative deliverable/content should be locked from additional revisions and modifications.
Phase 4: Launch
Finally, we are ready to launch the creative product. This phase is typically the simplest but doesn’t make it less important than the others. After all, this phase is the culmination of all your hard work in the previous phases.
You might still need to finalize some aspects of the workflow to tie up loose ends:
-
Document billing details and send an invoice to your client
-
Sending over the finished product to the client in its appropriate format
-
Maintain follow-up communication with the client
Why You Need To Optimize Your Creative Workflow
After discussing the four different phases of a creative workflow, we can see how there are many different potentials for inefficiencies throughout each phase.
While it’s true that a certain degree of freedom and flexibility is essential in a creative process to keep that creative juice flowing, applying structure to the process is also crucial.
Here are some significant benefits of implementing optimized and efficient creative workflow:
Standardized process
A structured, standardized, and optimized creative workflow will make the creative development process easier to execute, especially in a team where different people might vary in how they manage their work. Ultimately, this will lead to faster execution of the process with fewer errors, saving you time and money.
Fewer revision cycles
Arguably this is the most crucial benefit for creative workers. A creative workflow will allow your creative vision for the product to align with your client’s expectations. Thus, you’ll have fewer feedback rounds and revisions.
Better collaboration
The optimized creative workflow will allow more effective collaboration for your team, and in turn, will help your team going through tasks and milestones to deliver the product on time and within budget.
Better transparency and accountability
With creative workflow, we can ensure the right tasks are assigned to the right team member, ensuring the product we deliver is high-quality and stays within the deadline.
Lower risks of errors
By having a structured audit trail of the approval process, revisions, and changes, we can ensure the end product is 100% error-free and compliant according to the client’s expectations.
7 Steps To Implementing an Efficient Creative Workflow
As we can see, implementing an efficient, creative workflow and optimizing your process is very important, but it’s certainly not an easy task. However, in the end, the reward will be worth it, as you’ll get a more efficient, easier-to-execute, and less stressful way to deliver your creative projects every time.
Below, we will discuss the steps required to building an effective creative workflow:
Step 1: Define The Creative Project’s Scope
Before you can implement and optimize the creative workflow, it's essential to define the creative project's scope.
What is the scope? It outlines the project's goal (or goals) and a basic plan to achieve these goals. If you work for a client and have been provided with a creative brief, you should interpret the client's requirements and expectations from the project and define how you will plan to meet this client's objective.
The best approach is to meet with your client and discuss what they expect of the creative product. Clarify their purpose of using the product, the budget, timeline, and other details.
Write all these details down and use them to create an intake form. Ideally, it would be best to get the client to sign this document to ensure both parties' commitments and avoid confusion once the project has been launched.
Step 2: Create a Detailed Brief
Based on the defined project scope from the previous step, you can create a complete brief for the project. If the client has provided their brief, then you can update it, or else you can create a new brief from scratch that includes:
-
The outline of the project
-
Timeline and schedule for the creative project
-
Goals and milestones
-
Strategies for achieving the goals
-
Budget
-
Team members involved in the project and their roles (more on this on the next step)
Having an accurate and complete brief is essential, so you can ensure your team can stay aligned on the project’s goal throughout the project’s lifetime. Please make sure all pieces of information are easy to find, so your team can easily refer to the brief as they progress. This brief’s primary function is to ensure every team member and stakeholder can stay on the same page in completing the project.
Step 3: Delegating Tasks and Responsibilities
A crucial aspect of executing a creative workflow is ensuring tasks and responsibilities are assigned to the right people. Everyone needs to understand their role, and at the same time, knocking who’s working on which task can improve accountability and transparency.
Even if the creative project will be executed with just a few people, it’s still essential to assign roles and responsibilities, so don’t skip this step.
When assigning roles, there are a few principles to pay attention to:
-
First and foremost, assign a project manager who will be responsible for managing these different roles and keeping everyone on track.
-
Roles should be Mutually Exclusive, Collectively Exhaustive (MECE), so we won’t have gaps, but at the same time, we can stop actions from overlapping.
-
Attach specific guidelines and responsibilities on each role to maintain accuracy and prevent overlaps
-
Standardize tasks so we can easily pass them to new employees when necessary
-
Look for automation opportunities whenever possible.
List the roles and responsibilities in a written form, or you can create a chart. This is to make sure that none of the functions overlap and, at the same time, preventing gaps. Having a complete document/chart can also avoid the issue of your team members thinking that others will take care of tasks that are unaccounted for.
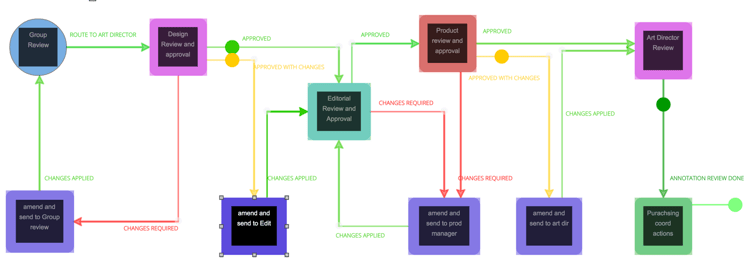
Step 4: Draft a Creative Workflow Diagram
The next step is to create a workflow diagram for the creative process. We can use various methods to develop the workflow diagram, but a simple ANSI flowchart can do the job.
The workflow diagram should accurately and completely map out the whole creative process (all steps and tasks involved) and show who will handle the tasks and when the tasks should be completed.
When assigning responsibilities in a workflow diagram, it’s best to use role names rather than individual names, so we don’t have to modify the diagram when an employee leaves the team.
A workflow diagram is useless if it’s inaccurate or incomplete. Interview different team members and stakeholders, as they might have different variations in executing the workflow. Identify the path that happens most often (the “typical” path), but review whether there are alternate paths that might be more efficient.
Also, for any points in the workflow that require approval or validation (decision points), identify what data will be necessary to make this decision. This is crucial to ensure a streamlined approval process (more on this below).
Step 5: Revise and Finalize The Workflow Diagram
The next step is to revise and finalize the workflow diagram.
The best approach is to involve your team members and stakeholders and discuss all the details of the creative project. Your objective is to make sure the diagram is as optimized as possible, so workflow analysis is also required.
We can optimize the workflow diagram by performing these three steps:
Prioritize different tasks and steps in the process based on their impacts. You can, for example, categorize the tasks into four different ranks: very important, important, nice to have, and redundant. Divide various tasks by roles/job descriptions to make categorization easier.
Look for redundancies, inefficiencies, bottlenecks, and any inefficient steps that slow down the process. Check whether the tasks and steps have aligned well with the creative project’s objective.
Look for automation opportunities. The general rule of thumb is that if it’s cost-effective enough to automate a step, we should implement workflow automation.
Once we’ve identified the most optimal form of the workflow diagram, get your entire team to sign off the creative workflow process so that it’s formal. Make sure all your team members can access the creative workflow easily, and send each a copy if necessary.
Step 6: Executing The Creative Workflow
Using workflow management software with online proofing capabilities lets you execute the creative workflow efficiently by having all team members and stakeholders collaborate in a single platform simultaneously.
This will help streamline the approval process, which, as discussed, is often the biggest bottleneck in most creative workflows. You can, for example, track the historical changes you’ve made in a creative product, so you can effectively avoid disputes throughout the approval process.
Thanks to Aproove’s online proofing function, you can now review and approve creative deliverables within the file itself. This will help streamline the approval process, avoid back-and-forth emails, and cut down on paper trails. The software can also provide automated notifications to update reviewers and creative workers when specific revisions are due for feedback.
Step 7: Review and Continuous Improvement
A considerable aspect of a successful creative workflow is ensuring the project stays on schedule as defined by the workflow diagram.
This is why it’s crucial to hold regular check-in meetings to ensure your team members are on track and tasks are being completed on schedule.
Once the project has been completed, it’s also essential to perform a complete evaluation to gain more insights into what you can improve in future projects.
Check:
-
The average length of approval processes
-
The number of revision cycles
-
The number of asset versions per project
-
The overall length of the project cycle (when compared to previous/similar creative projects).
It is important to measure whether your workflow optimization has worked or if there were still any bottlenecks in any step of the creative project. Organize an evaluation/follow-up meeting to gain feedback about the project’s execution and whether there are still areas that can be improved upon.
Closing Thoughts
An optimal and efficient creative workflow can allow your organization to deliver creative products accurately, on time, and budget. Thus, ultimately it will improve your business’s growth and profitability.
Today, with tools like Aproove, it’s easier than ever to build an efficient, creative workflow that can genuinely help your business streamline its process and execute creative projects more efficiently.
No Comments Yet
Let us know what you think